As well as creating standalone demos, DemoGo provides the functionality to create multiple demos as a Group Project. When projects are grouped together, users have access to each individual demo via the Group Menu.
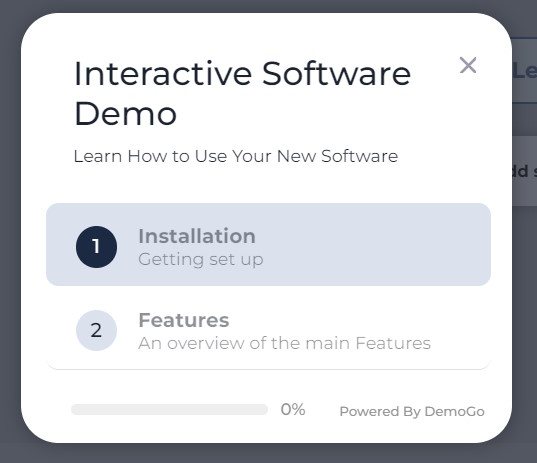
The Group Menu consists of the Group title and description, a list of the individual Demos within the Group, each with their own description, and a progress bar indicating what percentage of the Group has been completed by the user.
Creating a Group Project
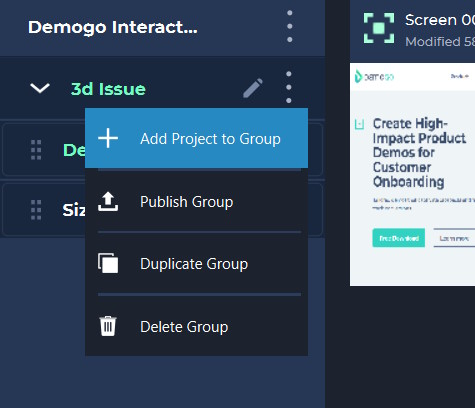
When creating a group, you will be prompted to enter both a name and description for the Group. This description will appear on the Group Menu of your Demo. You can then begin adding projects to the group by clicking on the three dots next to the Group name.
When adding a Project to a Group, you will be prompted to add a description for the Project. The description will appear under the Project name in the Group Demo.
The name you give your Group will become the end of the URL for your demo. For example, a Group called ‘MyGroup’ will end up having a URL something like this:
https://www.mywebsite.com/demos/MyGroup
Bear this in mind when naming your Group – a long Group name will result in an unwieldy URL when the Group is published. Any spaces in your Group name will be converted to ‘%20’ in the Group url, so a Group called ‘My Group’ will have a URL like this:
https://www.mywebsite.com/demos/My%20Group
You can keep your Group URLs more readable by using underscores or hyphens in place of spaces when naming your Groups.
Group names can be edited by double-clicking on the group in the Projects list or by clicking the pencil icon that appears next to the Group name. When a Group is renamed, the URL of the published Group will update to reflect the new Group name. This means that URLs that have been previously shared for the Group will be invalidated, so be sure to update any existing links to the Group.